Pages

Tuesday, July 16, 2013

Android For Absolute Beginners 2: The Keyboard

This is the second installment of my series on Android basics.

The first installment can be found at: http://robertmuth.blogspot.com/2013/07/android-for-absolute-beginners-1-home.html

This part discusses the Android keyboard.

The Android Keyboard

Tapping on a text input field will bring up the keyboard.

Usually, you will type a few characters and then hit the blue enter key (here labeled "Go") to accept the input. This will also make the keyboard disappear.

You can also press the back button. This will make the keyboard disappear without accepting the input, that means the content of text input field will remain as it was before.

Note: In the picture we have turned the device from the usual portrait mode to landscape mode. (You can switch modes by simply tilting the phone.) This will make the keyboard keys bigger at the expense of showing less of the actual app. If the keys are still too small for you, use a stylus to tap on the keys.

The Keyboard in Detail

Cursor
marks the place where the next keyboard character will be inserted
Clear
tapping here will clear all the text
Suggestions
Many apps will start showing suggestion after you type a few characters. Tapping on a suggestions will accept it as input and remove the keyboard from the screen
Backspace
erases the last character
Enter
accepts the text entered so far as input and remove the keyboard from the screen
More Keys
make other keys visible, e.g. numbers, capital letters, etc.

Different Flavors of Enter Keys

Depending on the circumstances, the keyboard may look slightly different. The picture shows the bottom row of 4 different incarnations of the Android keyboard. The main difference lies with the enter key which varies in color and labeling.

If the enter key is blue, like in first three incarnations, the keyboard will disappear after pressing the enter key. Usually, the corresponding text input field consists of just a single line.

If the text input field has several lines, the keyboard will look like the last incarnation. Pressing the enter key will not make the keyboard disappear but force a line break in the text input field.

Characters with Accents

Suppose you want to type an á or an ä. Simply tap the base character, a in this case, for a second or so. A menu like the one shown in the picture will pop up. Slide your finger to the desired character and let go.

Dictation: Voice Input

Often you can sidestep entering text altogether: Whenever Android shows you a microphone icon, you can dictate rather than type. Make sure you are in a reasonably quiet place. Think about what you want to dictate then take a breath and press the microphone key. When the device signals you speak, do so. The voice recognition on Android is actually quite good, so give this a try.

Sunday, July 14, 2013

Android For Absolute Beginners 1: The Home Screen

This set of posts originated in afternoons spent with my mom trying to teach her the basics of a Nexus 7 tablet. My mom had not used a computer in a decade and had no prior experience with smartphones or tablets. The goal was to get her comfortable searching and browsing, reading and writing emails.
The initial setup and home screen configuration of the tablet was assumed to be done by an "expert", aka me.
These notes are a reminder for her and whoever might find them useful.

Caveat: Android devices come in a bewildering variety of phones and tablets devices. We focus on Nexus 7 running Android version 4.1 ("Jelly Bean"). So the information might not immediately apply to your device.


The Home Screen


The home screen is where you end up when you turn on the device. The picture above shows the home screen for three different devices: A Galaxy Nexus phone, and Nexus 7 tablet, and a Galaxy s2 phone. The home screen is organized in three different areas:
  • a very narrow row at the top with status information
  • the big area in the middle that shows the icons and widgets
  • A small row at the bottom with several buttons that stay around pretty much all the time
We cover these areas in order of importance using the home screen at left as our example.

Bottom: Button Row

Depending on the device or app that it is currently running there can be any number of buttons here but only two of them really matter.
The home button is the most important one. It will always get you back to the home screen no matter where you are.
The back button is almost as important. It will get you back to the previous screen or remove any other thing that may have popped up on the display. If you press the back button often enough it should get you all the way back to the home screen as well.

Top: Status Row

The status row contains important information about your device.

The notification area on the left may be populated with tiny icons representing bits of information like "a new email has arrived". In the beginning it is ok to ignore those.

On the right side are several indicators. The most common are:
Wifi Signal
This applies primarily to tablets. If you do not have bars here you will not be able to use many of the features of the phone.
Phone Signal
This applies mostly to phones. If you have no bars here, you cannot make phone calls.
Battery Status
This gives you an idea of how much battery charge is still available. A white flash-like symbol in the middle of the battery icon indicates that the device is being charged.
Current time
Local time your area.
Note: additional options, including one for clearing the notification area become visible when you swipe downward on the status row.

Middle: Icon and Widget Area

Apps are what make smart phones and tablets so versatile. They allow you to browse the web, compose email, etc..
The icon and widget area shows icons for some of the apps on the phone. You can start ("launch") an App by tapping on its icon. This will usually lead to the display of a new screen hiding the home screen underneath it. But you can always get back to the home screen by pressing the home button, or the back button.

Widgets are a special kind of app. They allow access to some or all of the functionality of an app without having to launch it first. They typically employ much bigger icons.

Some not so Basic Stuff

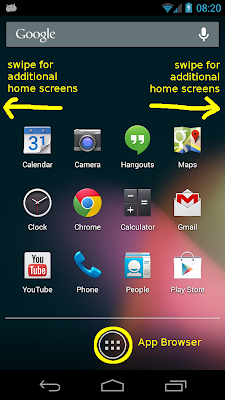
Over time is possible that you will accumulate more apps on your device than will fit on the home screen. Two mechanisms exist to deal with this situation: the app browser and additional home screens.

The app browser lets you browse and launch all the apps and widget which are installed on your phone.

Additional home screens can be found to the left and right of the main home screen, organized in a row of homescreens. Only one of them visible at a time and you can go to the neighboring ones by swiping left or right.
Remember: pressing the home button will always get you back to the main home screen.

Thursday, February 14, 2013

MAME on the ARM powered Samsung Chromebook

 
Starting with Chrome version 25, the Samsung Chromebooks with ARM processors are supporting Native Client. To take advantage of this new platform developers have to update their apps and include an ARM binary. Not many have done that.
To show the potential of the new platform I have added ARM support for my XaoS and Mame  apps.
Mame seems to be still a challenge for the machine - performance-wise, but is playable.

To check your chrome version use this URL chrome://help
and, if necessary, switch your Chromebook to the beta or dev channel to get a more recent
version of Chrome.