Recently I started using Google's Dart language for web development projects.
Not being a fan of JavaScript, Dart has made such projects fun again.
As a warm-up I have ported my favorite xscreensaver, Substrate, to the web.
You can try it out here:
http://muth.org/Art/substrate.html
It should work on most browsers and systems including mobile devices.
Wednesday, May 6, 2015

Tuesday, July 16, 2013
Android For Absolute Beginners 2: The Keyboard
This is the second installment of my series on Android basics.


 Suppose you want to type an á or an ä.
Simply tap the base character, a in this case, for a second or so.
A menu like the one shown in the picture will pop up.
Slide your finger to the desired character and let go.
Suppose you want to type an á or an ä.
Simply tap the base character, a in this case, for a second or so.
A menu like the one shown in the picture will pop up.
Slide your finger to the desired character and let go.
 Often you can sidestep entering text altogether:
Whenever Android shows you a microphone icon,
you can dictate rather than type.
Make sure you are in a reasonably quiet place. Think about what you want
to dictate then take a breath and press the microphone key.
When the device signals you speak, do so.
The voice recognition on Android is actually quite good, so give this a try.
Often you can sidestep entering text altogether:
Whenever Android shows you a microphone icon,
you can dictate rather than type.
Make sure you are in a reasonably quiet place. Think about what you want
to dictate then take a breath and press the microphone key.
When the device signals you speak, do so.
The voice recognition on Android is actually quite good, so give this a try.
The first installment can be found at: http://robertmuth.blogspot.com/2013/07/android-for-absolute-beginners-1-home.html
This part discusses the Android keyboard.The Android Keyboard

Tapping on a text input field will bring up the keyboard.
Usually, you will type a few characters and then hit the blue enter key (here labeled "Go") to accept the input. This will also make the keyboard disappear.
You can also press the back button. This will make the keyboard disappear without accepting the input, that means the content of text input field will remain as it was before.
Note: In the picture we have turned the device from the usual portrait mode to landscape mode. (You can switch modes by simply tilting the phone.) This will make the keyboard keys bigger at the expense of showing less of the actual app. If the keys are still too small for you, use a stylus to tap on the keys.
The Keyboard in Detail

- Cursor
- marks the place where the next keyboard character will be inserted
- Clear
- tapping here will clear all the text
- Suggestions
- Many apps will start showing suggestion after you type a few characters. Tapping on a suggestions will accept it as input and remove the keyboard from the screen
- Backspace
- erases the last character
- Enter
- accepts the text entered so far as input and remove the keyboard from the screen
- More Keys
- make other keys visible, e.g. numbers, capital letters, etc.
Different Flavors of Enter Keys

Depending on the circumstances, the keyboard may look slightly different. The picture shows the bottom row of 4 different incarnations of the Android keyboard. The main difference lies with the enter key which varies in color and labeling.
If the enter key is blue, like in first three incarnations, the keyboard will disappear after pressing the enter key. Usually, the corresponding text input field consists of just a single line.
If the text input field has several lines, the keyboard will look like the last incarnation. Pressing the enter key will not make the keyboard disappear but force a line break in the text input field.
Characters with Accents

Dictation: Voice Input

Sunday, July 14, 2013
Android For Absolute Beginners 1: The Home Screen
This set of posts originated in afternoons spent with my mom trying to teach her the basics of a Nexus 7 tablet.
My mom had not used a computer in a decade and had no prior experience with smartphones or tablets.
The goal was to get her comfortable searching and browsing, reading and writing emails.
The initial setup and home screen configuration of the tablet was assumed to be done by an "expert", aka me.
These notes are a reminder for her and whoever might find them useful.

The home screen is where you end up when you turn on the device. The picture above shows the home screen for three different devices: A Galaxy Nexus phone, and Nexus 7 tablet, and a Galaxy s2 phone. The home screen is organized in three different areas: Depending on the device or app that it is currently running there can
be any number of buttons here but only two of them really matter.
Depending on the device or app that it is currently running there can
be any number of buttons here but only two of them really matter.
The home button is the most important one. It will always get you back to the home screen no matter where you are.
The back button is almost as important. It will get you back to the previous screen or remove any other thing that may have popped up on the display. If you press the back button often enough it should get you all the way back to the home screen as well.
 The status row contains important information about your device.
 Apps are what make smart phones and tablets so versatile. They allow you to browse the web, compose email, etc..
The icon and widget area shows icons for some of the apps on the phone. You can start ("launch") an App by tapping on its icon. This will usually lead to the display of a new screen hiding the home screen underneath it. But you can always get back to the home screen by pressing the home button, or the back button.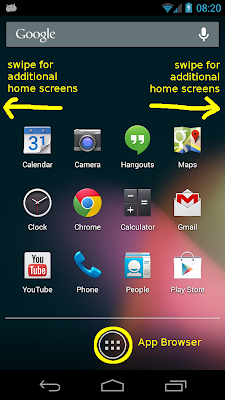
The initial setup and home screen configuration of the tablet was assumed to be done by an "expert", aka me.
These notes are a reminder for her and whoever might find them useful.
Caveat: Android devices come in a bewildering variety of phones and tablets devices. We focus on Nexus 7 running Android version 4.1 ("Jelly Bean"). So the information might not immediately apply to your device.
The Home Screen

The home screen is where you end up when you turn on the device. The picture above shows the home screen for three different devices: A Galaxy Nexus phone, and Nexus 7 tablet, and a Galaxy s2 phone. The home screen is organized in three different areas:
- a very narrow row at the top with status information
- the big area in the middle that shows the icons and widgets
- A small row at the bottom with several buttons that stay around pretty much all the time
Bottom: Button Row

The home button is the most important one. It will always get you back to the home screen no matter where you are.
The back button is almost as important. It will get you back to the previous screen or remove any other thing that may have popped up on the display. If you press the back button often enough it should get you all the way back to the home screen as well.
Top: Status Row

The notification area on the left may be populated with tiny icons representing bits of information like "a new email has arrived". In the beginning it is ok to ignore those.
On the right side are several indicators. The most common are:- Wifi Signal
- This applies primarily to tablets. If you do not have bars here you will not be able to use many of the features of the phone.
- Phone Signal
- This applies mostly to phones. If you have no bars here, you cannot make phone calls.
- Battery Status
- This gives you an idea of how much battery charge is still available. A white flash-like symbol in the middle of the battery icon indicates that the device is being charged.
- Current time
- Local time your area.
Middle: Icon and Widget Area

The icon and widget area shows icons for some of the apps on the phone. You can start ("launch") an App by tapping on its icon. This will usually lead to the display of a new screen hiding the home screen underneath it. But you can always get back to the home screen by pressing the home button, or the back button.
Widgets are a special kind of app. They allow access to some or all of the functionality of an app without having to launch it first. They typically employ much bigger icons.
Some not so Basic Stuff

Over time is possible that you will accumulate more apps on your device than will fit on the home screen. Two mechanisms exist to deal with this situation: the app browser and additional home screens.
The app browser lets you browse and launch all the apps and widget which are installed on your phone.
Additional home screens can be found to the left and right of the main home screen, organized
in a row of homescreens.
Only one of them visible at a time and you can go to the neighboring ones by swiping left or right.
Remember: pressing the home button will always get you back to the main home screen.
Thursday, February 14, 2013
MAME on the ARM powered Samsung Chromebook

Starting with Chrome version 25, the Samsung Chromebooks with ARM processors are supporting Native Client. To take advantage of this new platform developers have to update their apps and include an ARM binary. Not many have done that.
To show the potential of the new platform I have added ARM support for my XaoS and Mame apps.
Mame seems to be still a challenge for the machine - performance-wise, but is playable.
To check your chrome version use this URL chrome://help
and, if necessary, switch your Chromebook to the beta or dev channel to get a more recent
version of Chrome.
Sunday, November 18, 2012
Update of the Native Client MAME Port
I finally got around to update the Native Client MAME port in the Chrome Webstore.
The update features two new ROMs (Looping and Super Tank) which were generously
made available by Reinhard Stompe.
All ROMs can be conveniently selected from that start page.
If you are using Chome -- and you should -- you can install MAME from this link:
MAME in the Chrome Webstore


The update features two new ROMs (Looping and Super Tank) which were generously
made available by Reinhard Stompe.
All ROMs can be conveniently selected from that start page.
If you are using Chome -- and you should -- you can install MAME from this link:
MAME in the Chrome Webstore
Details:
- The port is based on MAME version 0.147u2.
- In order to keep its size reasonable and because of performance concerns many of the more recent CPUs together with the ROMs using them are not supported.
- This still leaves the number of supported ROMs at over 17000.
- Thanks to cleanup in the upstream code base the port was vastly simpler than the original one described here.
- Patches will be posted here shortly.
Saturday, September 1, 2012
Moving my opensource projects to code.google.com
I have begun the process of moving all my opensource projects to code.google.com.
Since I am also taking the opportunity to clean up and update the projects, this will
undoubtedly take a while.
The first project to move over is Hocuspocus, a simple webserver for remote controlling
Linux machine, which I run on most of my systems.
The website lives here:
http://muth.org/Robert/Hocuspocus/
The code can found here:
http://code.google.com/p/hocuspocus/
Since I am also taking the opportunity to clean up and update the projects, this will
undoubtedly take a while.
The first project to move over is Hocuspocus, a simple webserver for remote controlling
Linux machine, which I run on most of my systems.
The website lives here:
http://muth.org/Robert/Hocuspocus/
The code can found here:
http://code.google.com/p/hocuspocus/
Friday, August 3, 2012
Better Bash Scripting in 15 Minutes

The tips and tricks below originally appeared as one of Google's "Testing on the Toilet" (TOTT) episodes.
This is a revised and augmented version.
Safer Scripting
I start every bash script with the following prolog:
If a failing command is to be tolerated use this idiom:
“mkdir -p” and “rm -f”.
Also note, that the “errexit” mode, while a valuable first line of defense, does not catch all failures, i.e. under certain circumstances failing commands will go undetected.
(For more info, have a look at this thread.)
A reader suggested the additional use of "set -o pipefail"
Some more instructive examples:
Try moving all bash code into functions leaving only global variable/constant definitions and a call to “main” at the top-level.
Strive to annotate almost all variables in a bash script with either local or readonly.
$()also permits nesting without the quoting headaches.
and adds new functionality:
Operator Meaning
|| logical or (double brackets only)
&& logical and (double brackets only)
< string comparison (no escaping necessary within double brackets)
-lt numerical comparison
= string matching with globbing
== string matching with globbing (double brackets only, see below)
=~ string matching with regular expressions (double brackets only , see below)
-n string is non-empty
-z string is empty
-eq numerical equality
-ne numerical inequality
single bracket
double brackets
These new capabilities within double brackets are best illustrated via examples:
must not be quoted. If your expression contains whitespace you can store it in a variable:
This is where <() operator comes in handy as it takes a command and transforms it into something
which can be used as a filename:
in on stdin. The two occurrences of 'MARKER' brackets the document.
'MARKER' can be any text.
If parameter substitution is undesirable simply put quotes around the first occurrence of MARKER:
$n positional parameters to script/function
$$ PID of the script
$! PID of the last command executed (and run in the background)
$? exit status of the last command (${PIPESTATUS} for pipelined commands)
$# number of parameters to script/function
$@ all parameters to script/function (sees arguments as separate word)
$* all parameters to script/function (sees arguments as single word)
$@ handles empty parameter list and white-space within parameters correctly
$@ should usually be quoted like so "$@"
bash -n myscript.sh
To produce a trace of every command executed run:
bash -v myscripts.sh
To produce a trace of the expanded command use:
bash -x myscript.sh
-v and -x can also be made permanent by adding
set -o verbose and set -o xtrace to the script prolog.
This might be useful if the script is run on a remote machine, e.g.
a build-bot and you are logging the output for remote inspection.
#!/bin/bashThis will take care of two very common errors:
set -o nounset
set -o errexit
- Referencing undefined variables (which default to "")
- Ignoring failing commands
If a failing command is to be tolerated use this idiom:
if ! <possible failing command> ; then
echo "failure ignored"
fi
Note that some Linux commands have options which as a side-effect suppress some failures, e.g.
“mkdir -p” and “rm -f”.
Also note, that the “errexit” mode, while a valuable first line of defense, does not catch all failures, i.e. under certain circumstances failing commands will go undetected.
(For more info, have a look at this thread.)
A reader suggested the additional use of "set -o pipefail"
Functions
Bash lets you define functions which behave like other commands -- use them liberally; it will give your bash scripts a much needed boost in readability:ExtractBashComments() {
egrep "^#"
}
cat myscript.sh | ExtractBashComments | wc
comments=$(ExtractBashComments < myscript.sh)
Some more instructive examples:
SumLines() { # iterating over stdin - similar to awk
local sum=0
local line=””
while read line ; do
sum=$((${sum} + ${line}))
done
echo ${sum}
}
SumLines < data_one_number_per_line.txt
log() { # classic logger
local prefix="[$(date +%Y/%m/%d\ %H:%M:%S)]: "
echo "${prefix} $@" >&2
}
log "INFO" "a message"
Try moving all bash code into functions leaving only global variable/constant definitions and a call to “main” at the top-level.
Variable Annotations
Bash allows for a limited form of variable annotations. The most important ones are:- local (for local variables inside a function)
- readonly (for read-only variables)
# a useful idiom: DEFAULT_VAL can be overwritten
# with an environment variable of the same name
readonly DEFAULT_VAL=${DEFAULT_VAL:-7}
myfunc() {Note that it is possible to make a variable read-only that wasn't before:
# initialize a local variable with the global default
local some_var=${DEFAULT_VAL}
...
}
x=5
x=6
readonly x
x=7 # failure
Strive to annotate almost all variables in a bash script with either local or readonly.
Favor $() over backticks (`)
Backticks are hard to read and in some fonts easily confused with single quotes.$()also permits nesting without the quoting headaches.
# both commands below print out: A-B-C-D
echo "A-`echo B-\`echo C-\\\`echo D\\\`\``"
echo "A-$(echo B-$(echo C-$(echo D)))"
Favor [[]] (double brackets) over []
[[]] avoids problems like unexpected pathname expansion, offers some syntactical improvements,and adds new functionality:
Operator Meaning
|| logical or (double brackets only)
&& logical and (double brackets only)
< string comparison (no escaping necessary within double brackets)
-lt numerical comparison
= string matching with globbing
== string matching with globbing (double brackets only, see below)
=~ string matching with regular expressions (double brackets only , see below)
-n string is non-empty
-z string is empty
-eq numerical equality
-ne numerical inequality
single bracket
[ "${name}" \> "a" -o ${name} \< "m" ]
double brackets
[[ "${name}" > "a" && "${name}" < "m" ]]
Regular Expressions/Globbing
These new capabilities within double brackets are best illustrated via examples:
t="abc123"Note, that starting with bash version 3.2 the regular or globbing expression
[[ "$t" == abc* ]] # true (globbing)
[[ "$t" == "abc*" ]] # false (literal matching)
[[ "$t" =~ [abc]+[123]+ ]] # true (regular expression)
[[ "$t" =~ "abc*" ]] # false (literal matching)
must not be quoted. If your expression contains whitespace you can store it in a variable:
r="a b+"
[[ "a bbb" =~ $r ]] # true
Globbing based string matching is also available via the case statement:
Basics
Substitution (with globbing)
case $t in
abc*) <action> ;;
esac
String Manipulation
Bash has a number of (underappreciated) ways to manipulate strings.Basics
f="path1/path2/file.ext"
len="${#f}" # = 20 (string length)
# slicing: ${<var>:<start>} or ${<var>:<start>:<length>}
slice1="${f:6}" # = "path2/file.ext"
slice2="${f:6:5}" # = "path2"
slice3="${f: -8}" # = "file.ext"(Note: space before "-")
pos=6
len=5
slice4="${f:${pos}:${len}}" # = "path2"
Substitution (with globbing)
f="path1/path2/file.ext"
single_subst="${f/path?/x}" # = "x/path2/file.ext"
global_subst="${f//path?/x}" # = "x/x/file.ext"
# string splitting
readonly DIR_SEP="/"
array=(${f//${DIR_SEP}/ })
second_dir="${array[1]}" # = path2
Deletion at beginning/end (with globbing)
f="path1/path2/file.ext"
# deletion at string beginning extension="${f#*.}" # = "ext"
# greedy deletion at string beginning
filename="${f##*/}" # = "file.ext"
# deletion at string end
dirname="${f%/*}" # = "path1/path2"
# greedy deletion at end
root="${f%%/*}" # = "path1"
Avoiding Temporary Files
Some commands expect filenames as parameters so straightforward pipelining does not work.This is where <() operator comes in handy as it takes a command and transforms it into something
which can be used as a filename:
# download and diff two webpagesAlso useful are "here documents" which allow arbitrary multi-line string to be passed
diff <(wget -O - url1) <(wget -O - url2)
in on stdin. The two occurrences of 'MARKER' brackets the document.
'MARKER' can be any text.
# DELIMITER is an arbitrary string
command << MARKER
...
${var}
$(cmd)
...
MARKER
If parameter substitution is undesirable simply put quotes around the first occurrence of MARKER:
command << 'MARKER'
...
no substitution is happening here.
$ (dollar sign) is passed through verbatim.
...
MARKER
Built-In Variables
For reference
$0 name of the script$n positional parameters to script/function
$$ PID of the script
$! PID of the last command executed (and run in the background)
$? exit status of the last command (${PIPESTATUS} for pipelined commands)
$# number of parameters to script/function
$@ all parameters to script/function (sees arguments as separate word)
$* all parameters to script/function (sees arguments as single word)
Note
$* is rarely the right choice.$@ handles empty parameter list and white-space within parameters correctly
$@ should usually be quoted like so "$@"
Debugging
To perform a syntax check/dry run of your bash script run:bash -n myscript.sh
To produce a trace of every command executed run:
bash -v myscripts.sh
To produce a trace of the expanded command use:
bash -x myscript.sh
-v and -x can also be made permanent by adding
set -o verbose and set -o xtrace to the script prolog.
This might be useful if the script is run on a remote machine, e.g.
a build-bot and you are logging the output for remote inspection.
Signs you should not be using a bash script
- your script is longer than a few hundred lines of code
- you need data structures beyond simple arrays
- you have a hard time working around quoting issues
- you do a lot of string manipulation
- you do not have much need for invoking other programs or pipe-lining them
- you worry about performance
Instead consider scripting languages like Python or Ruby.
References
- Advanced Bash-Scripting Guide: http://tldp.org/LDP/abs/html/
- Bash Reference Manual
Thanks to Peter Brinkmann and Kim Hazelwood for their feedback on drafts of this post.
Subscribe to:
Posts (Atom)